I wrote this post several years ago as a guest post for another blog. In it, I give a step-by-step tutorial in using PicMonkey to edit photos. The original audience was other bloggers, but since we live in a social media culture, I believe that this info can be useful for anyone who wants to post photos with text.

As a Christian blogger, I daily look for new ways to get my message out to my readers. Anything I can do to draw in a reader or get them to listen to my message is something I want to utilize as much as possible. One of the questions I am most often asked by my mommy blogger friends is how to add text to photos in order to capture the readers’ attention. Today I’m going to let you in on a little secret: It’s really not that hard. I use a free online site called PicMonkey.com that makes it easy peasy. But before we get to the how-to of adding text, let’s first answer the why.
Adding text can make a photo more descriptive. As you know, I write a lot of recipe posts. Because a stand-alone image doesn’t always convey what the dish is or what it contains, I often add text to give readers more information about the dish. Maybe you don’t write about food as much as I do, but text can be added to any kind of image in order to achieve the same results.
Adding text makes a photo more likely to be shared on social media. If you are trying to reach as many people as possible with the message of your post, using social media to promote your posts can yield big results. Pinterest has been my top referral site for several years, but Facebook, Twitter, and now Google Plus are not far behind. Because social media is so full of images, we tend to glance over items that don’t have an eye-catching component. Text can be used to bring the reader’s eye to your image, thereby giving you an opportunity to engage them with your writing. In a word, if you have a pinnable, tweetable, shareable image, your post will receive more views than one that doesn’t intrigue readers.
Using text to watermark your images: You work hard to write original content and take captivating photos to enhance your writing. Unfortunately in today’s social media environment, there are some less than honest people who actually go to great lengths to steal photos and content. While that’s certainly frustrating enough to be plagiarized, there are readers who steal content and photos with more devious intentions. One of the most agonizing I’ve experienced recently was a social media acquaintance who had a picture of her son stolen and circulated as one of the victims in the Sandy Hook Elementary School shooting. The person who lifted her son’s photo was “trying to raise money for funeral expenses.” Needless to say, it was a huge scam, but it took her several days to clear up the mess. By that time a lot of damage had been done. Watermarking your photos adds a level of security to your images. While watermarking might not stop a very determined image thief, it will discourage most people from lifting your pictures.
Now that you are sufficiently convinced that text can enhance the effectiveness of your photos, let’s dig in. Again, PicMonkey is my go-to site for photo editing. There are other options available, but this is the one that I believe offers the most options on their free version. PicMonkey.com does offer a paid version with more options, including additional fonts, but I have chosen to stick with the free option and have been able to do everything I’ve wanted to do.
When you go to PicMonkey.com, the first step is to upload the image you want to edit.

The next step is to crop the photo if needed.

Once your photo is cropped you are ready to add text. Sometimes I add text directly to the photo, but if the photo is busy and the text might get lost on the image, I will usually add a banner background on which to place the text.

Once the overlay is in place, you can adjust the color or transparency of the banner.

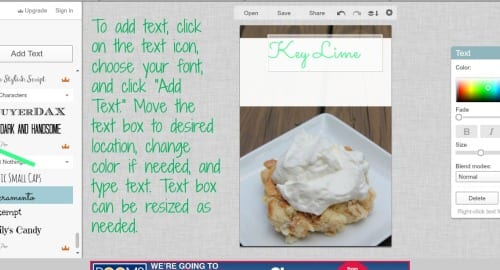
Once your background for the text is in place, you are ready to add the text. PicMonkey.com has lots of fonts to choose from, but only allows one font type per text box If you want to add several fonts, you must do it with separate text boxes. Just like with overlays, the color and placement of the text is changeable. Within the free version, you can choose any font without the little crown icon next to it. The fonts with the crown icon are part of the Royale edition, which is the paid version.
Once you have added all of the text you desire, you are ready to save the image to your computer. Saving your image is a simple step.

I find that PicMonkey.com is user-friendly and allows me to edit photos in most any way I need to. It has been an invaluable tool in creating professional looking images to enhance my blog posts. I hope you’ll find these steps useful in adding your own text to photos. If you’re interested in trying out PicMonkey, click the picture… (affiliate link)


This is such a great tutorial! Pinning everywhere!
Thanks so much, Beth!
thanks for the tips! I am a rookie blogger (really a wanna be still trying to get there)! All tips are welcome….and yours makes sense!
Hey, Sue! Glad you stopped by. We are all just trying to get better everyday. Happy to help you make a little progress.