Italian Parmesan Pork Chops

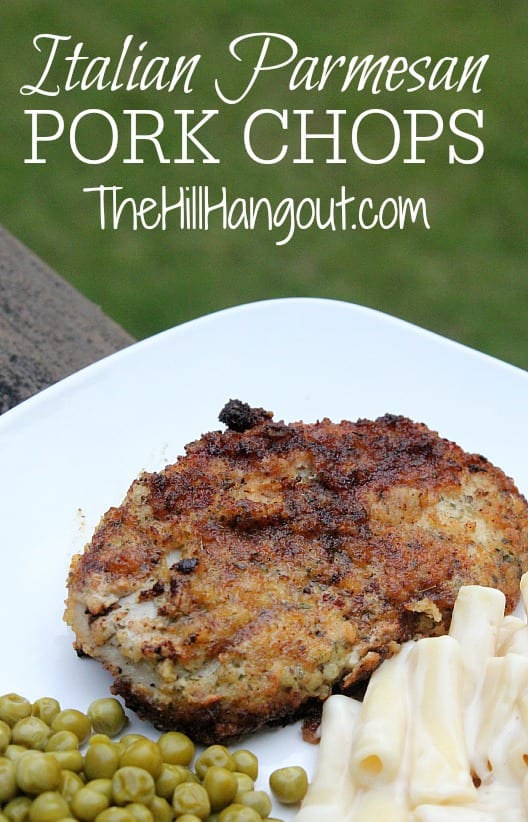
Sometimes I feel sorry for the pork chop. It gets a bad rap as being a boring dinner entree. And, granted, at times it earns that reputation. Without much spice, the pork chop can be dull, dry, and tough to chew. But with a little seasoning and effort, the plain pork chop can become a well-loved dinner that everyone enjoys. Kind of like life, huh? It takes a little effort to make a dull, boring life into a beautiful work of art that everyone in the family enjoys, but it is so worth the effort.

Italian Parmesan Pork Chops take a little more effort than some of the dishes we present to you on The Hill Hangout, but they have become a family favorite for us. Served with homemade mashed potatoes or creamy noodles, they are comfort food. And they make my people glad they get to eat around our table.

Italian Parmesan Pork Chops

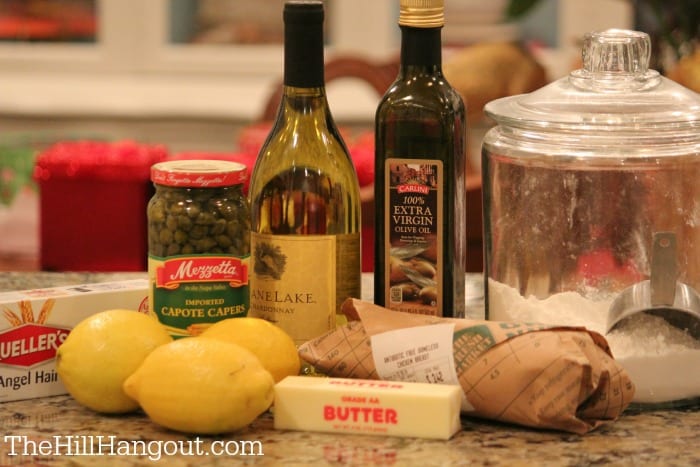
Here’s what you’ll need…

4 pork chops (I used boneless, center cut, but you could use bone-in chops as well.)
2 tablespoons olive or vegetable oil
1/2 cup grated parmesan cheese
1/2 sleeve of crackers
1/2 teaspoon pepper
1 tablespoon dried chopped parsley
1 tablespoon Italian seasoning
1/2 teaspoon garlic powder
1/2 teaspoon onion powder
1 egg
1 tablespoon water

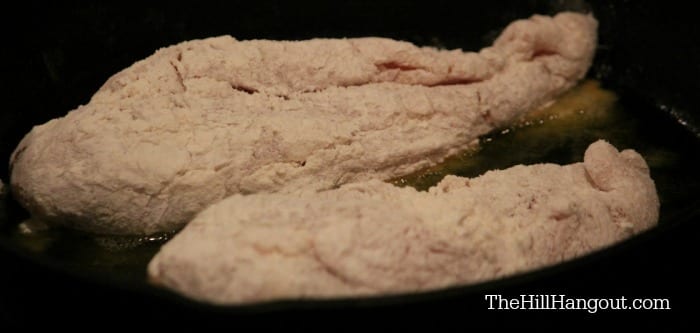
Heat oil in skillet over medium heat. Spray baking dish with cooking spray. Preheat oven to 350 degrees. Wash pork chops and pat dry with a paper towel.

Italian Parmesan Pork Chops

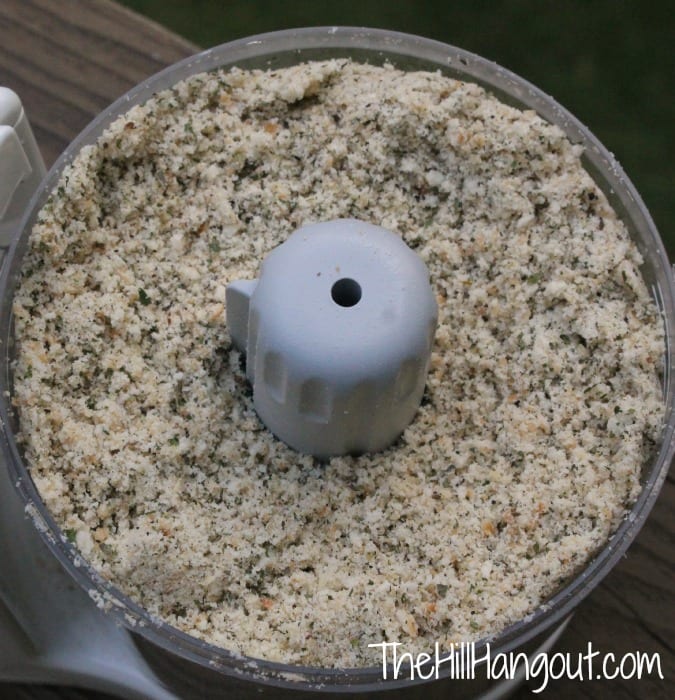
Add parmesan cheese, crackers, pepper, parsley, Italian seasoning, garlic, and onion powder in a mini chopper or food processor.

Italian Parmesan Pork Chops

Pulverize until it has a bread crumb texture.

Italian Parmesan Pork Chops

Beat egg with water. Pour egg wash in one dish and bread crumbs in another. Dredge pork chops in egg wash and then bread crumb mixture.

Italian Parmesan Pork Chops

Fry pork chops in oil for about 4-5 minutes on each side or until slightly browned.

Italian Parmesan Pork Chops

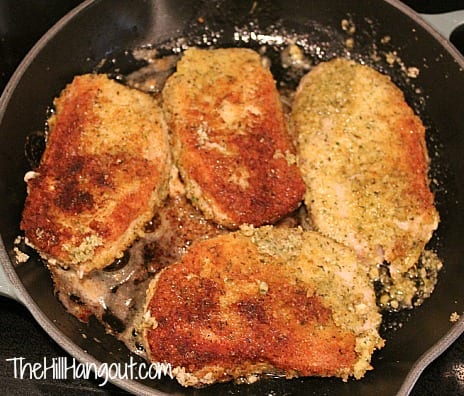
Transfer to a baking dish and bake for about 30 minutes.

Behold the beauty of the seasoned pork chop. And behold the beauty of the seasoned life. They both take a little effort, but you will definitely reap more than you sow.

Lemon Dill Aioli

Lemon Dill Aioli

There is nothing better in this world than a pan of piping hot roasted oven fries with sea salt. And there is nothing better on those oven fries than a good sauce. Last night we’d had enough of the meat and three meals, so I roasted a pan of sweet potatoes and a pan of sliced red potatoes, both coated in olive oil and sprinkled with sea salt. I made a batch of Creamy Sriracha Dipping Sauce for the sweet potatoes and a bowl of Lemon Dill Aioli for the red potatoes. My stars, I think it was the best meal we’ve had in ages.

This was the first time I’ve made aioli, and it was super easy and so, so delicious. The lemon and dill work perfectly together, and they set off the taste of the roasted oven fries in a way that might bring a tear to your eye.

All you’ll need is about a cup of mayonnaise, 1/4 cup of lemon juice (I used bottled this time around, but fresh-squeezed would be great, too), 1 tablespoon grainy mustard, 1 tablespoon dried dill, and 1/2 teaspoon of garlic powder. Mix them together, let it sit for a minute so the flavors get to know each other, and serve it up. So easy. So delicious.

Lemon Dill Aioli

Lemon Dill Aioli is also commonly served on grilled fish like salmon, but it would also be terrific on chicken or beef. It’s a good all-purpose sauce.

Hope you guys enjoy it!


[yumprint-recipe id=’52’]

Hot Chocolate Mix

Hot Chocolate Mix

We’ve been fighting off snowy weather for the better part of two weeks around here. Schools have had late starts more than regular starts lately. Today’s weather called for 2″-4″ of snow, so there’s not a school around in session today. I do think some places north of us are getting a little dusting, but so far, we haven’t gotten the first snow flake.

Anytime it’s cold outside, my girls want a big mug of piping hot chocolate. For years, I’ve bought Swiss Miss or some other national brand, but I’ve always wanted to make my own. Fortunately, Mary Anneliese was game for making the homemade hot chocolate today. After a little searching around on ye olde interwebs for some ideas, she landed on a combination that was natural, inexpensive, and delicious. The good thing about this hot chocolate mix is that the dry mix stores beautifully in an air-tight container. When you’re ready for a warm cup, just warm a cup of milk in the microwave and stir in the dry mix. Voila!

You’ll need 1 3/4 cups sugar, 1 cup cocoa powder, and 2 teaspoons salt. Mix with a whisk and store in an air-tight container. I used a mason jar, and it worked perfectly. When ready to make a cup of hot chocolate, warm a cup of milk in the microwave for 1 minute. Stir in 2 tablespoons of hot chocolate mix for each cup of milk. And, of course, no cup of hot chocolate is complete without a big dollop of real whipping cream.

Enjoy and stay warm on this cold, winter day!

Sausage Pastry

Sausage Pastry

We’ve been making Jonathan’s Sausage Pinwheels for years around the Hill Hangout. They are one of our go-to breakfasts. We probably make them about once a week, and for whatever reason, that job has always fallen to Jonathan. He’s more patient about spreading the filling on the dough than I am, and he’s a better roller-upper than me. A few weeks ago, however, one of our friends brought a similar dish to Sunday school but it was baked in a pan. I’m not sure why I never thought about how much easier that would be, but it was my first introduction to Sausage Pastry.

To make Sausage Pastry, you’ll need:

1 roll of breakfast sausage, browned and drained
2 cans of crescent rolls (You can use the new non-perforated sheets, but my grocery didn’t have them.)
1 8-oz block of cream cheese, softened
1 8-oz block of cheddar cheese, grated

Spray a baking sheet with cooking spray, and roll out one can of crescent rolls to form the bottom crust.

Sausage Pastry

Brown, crumble, and drain the sausage. Return it to the warm pan. Mix with cream cheese to make the filling. Spread the filling over the crust dough.

Sausage Pastry

Cover filling with the grated cheddar.

Sausage Pastry

Make a top crust out of the remaining can of crescent rolls.

Sausage Pastry

Bake on 350 degrees until top is slightly golden, usually about 15 minutes.

Sausage Pastry

Slice into squares to serve.

Sausage Pastry

This one is a crowd-pleaser, so you can feel good about taking it to church, school breakfasts, or even as an appetizer.

[yumprint-recipe id=’51’]

Chicken Piccata

Chicken PIccata

Chicken Piccata has always been one of my husband’s favorite dishes. The tart lemon, salty capers, butter, and white wine are the perfect combination of flavors. We typically serve it over pasta, but you can also serve it with homemade mashed potatoes or roasted potatoes.

One thing to remember about Chicken Piccata is that it cooks quickly. It really helps to have all of your ingredients laid out, and even have it measured out if you can.

Chicken PIccata

2 boneless skinless chicken breasts
1 cup flour
Salt and Pepper
3 tablespoons butter
2 tablespoons olive oil
Juice of 3 lemons
1/2 cup white wine
1/2 box pasta
2 tablespoons capers
1 tablespoon dried chopped parsley

Boil water for noodles.

Melt butter and olive oil over medium high heat in a skillet. Mix flour, salt, and pepper together and dredge chicken in flour mixture.

Chicken PIccata

When butter is melted and sizzling, reduce heat to medium and fry chicken for about 5 minutes on each side. (Frying time for chicken will vary depending on thickness. Be sure to cook chicken thoroughly.)

Chicken PIccata

When chicken is cooked through, remove from pan and put on plate.

Boil noodles.

Deglaze pan with white wine. Add lemon juice and capers.

Chicken Piccata

Return chicken to pan and simmer for about 5 more minutes.

Drain and plate pasta.

Place chicken over pasta and spoon extra sauce over the top. Sprinkle parsley as garnish.

Chicken PIccata

This is one of those dishes that will make your family want to gather around your dinner table and hang out a while. Make it for them often. Talk about life with them. Dream big dreams with them. Enjoy your time with them.

[yumprint-recipe id=’50’]

Hummus

Hummus Recipe from TheHillHangout.com

We have local Mediterranean restaurant in Birmingham called Nabeel’s, and they serve the most delicious hummus in the world. In fact, since it was the first place I ever tried hummus, every hummus since then has been held up to the standard of Nabeel’s.

One of my dear darling children who doesn’t eat very many things, loves hummus. And since it’s made with chickpeas, we go with it and call it her vegetable for the day. Since it is one of the few “healthy” things she will eat, we buy a LOT of hummus. I have tried to make it several times in the past, but the recipe just wasn’t right. However, the other day I came across a recipe that tasted just like Nabeel’s!!! Score!

It was really simple to make, and it makes a ton of hummus. Here’s what you’ll need:

Hummus

2 cans of chickpeas, drain and reserve liquid
1 tablespoon olive oil
1/3 cup tahini
Juice of 3 lemons (about 1/3 cup)
1 tablespoon minced garlic
1 1/2 teaspoons kosher salt
3 tablespoons (or more) of reserved liquid from chickpeas

2 Tablespoons olive oil
1/2 teaspoon paprika
Kalamata olives to garnish

Put all ingredients (except remaining olive oil, paprika, and kalamata olives) into a blender and blend. (Super complicated recipe, right?) Thin to desired consistency by adding more of the reserved liquid and continuing to blend. **UPDATE: Since publishing this post, I upgraded my blender to this Ninja model. I LOVE it!! I feel like it would blend a car tire!

Pour into serving bowl. Sprinkle with paprika. Drizzle with remaining olive oil. Top with kalamata olives. Serve with pita chips.

[yumprint-recipe id=’49’]Hummus Recipe from TheHillHangout.com

Chocolate Peanut Clusters

Chocolate Peanut Clusters Chocolate Peanut Clusters were a new addition to our holiday celebrations this year. While I love spending time in the kitchen, quick and easy was the name of the game this year. I wanted a few sweet treats that were decadent, but didn’t require hours of cooking time. Chocolate Peanut Clusters were a big hit at our holiday parties, family dinners, and even our New Year’s Eve get-together. You only need three ingredients for Chocolate Peanut Clusters: a jar of dry roasted peanuts, a package of chocolate almond bark, and a sheet of wax paper. I use a double boiler to melt the chocolate almond bark, but you can also melt it in a glass bowl in the microwave. Just melt the chocolate, pour in the jar of peanuts, and mix well to coat all of the peanuts in chocolate. Drop by spoonfuls onto the wax paper. I use my well-loved small cookie scoop for this part. Chocolate Peanut Clusters Let them cool for about 15 minutes or until set. Peel off wax paper and store in an air-tight container until ready to serve. Chocolate Peanut Clusters I told you they were simple to make! And yet they taste like you spend your whole afternoon working on them. Your people will feel loved and adored and fussed over. My kind of sweet treat!

[yumprint-recipe id=’48’]

Most Popular Posts of 2014

Best of 2014 collage

2014 has been a terrific year around the Hill Hangout! We have had more readers this year than in any other previous year since 2007, when we started posting a few pictures for our out-of-town family to see. I thank you from the bottom of my heart for hanging out with us. I feel that I have found MY people – the ones who love the Lord, love their families, love good food, love to fix things that are broken down, and love to explore new places. My top ten posts from 2014 reflect just that! I hope you’ll stick around for 2015.

10. Yum Yum Sauce

Yum Yum Sauce

9. The Best Homemade And Killer

Ant Killer

8. The Magic of Chalk Paint

Green Caneback Chairs

7. Mudslide Pie

Mudslide Pie

6. Summer Art Projects

Art

5. Back to School Prayers

Back to school

4. Greek Seasoning

Greek Seasoning

3. Creamy Sriracha Dipping Sauce

Sriracha

2. Loaded Cornbread

Loaded Cornbread

1. Miracle Treatment for Eczema

alt="home remedy for eczema"

Feta Pull Apart Bread

Feta Pull Apart Bread

A few years ago, when we were visiting my parents in Orange Beach, my mom tried out a new recipe on us that she knew we’d love. She was right! She picked up a recipe for Feta Pull Apart Bread from a friend who had served it at a Sunday school party, and she knew it would be right up our alley. Feta Pull Apart Bread is so simple, but it is one of those dishes that taste like you spent hours on it. And it only requires a few ingredients, all of which are easily found in your local grocery store. We happen to like it with feta, but we also love to make it with bleu cheese – any type of crumbly cheese with a strong flavor will do.

Feta Pull Apart Bread

Start with a can of refrigerated biscuits. I use Grands jumbo biscuits, which come with 10 biscuits in the can. Cut each biscuit into quarters.

Feta Pull Apart Bread

Spray a baking dish with cooking spray. Put a stick of butter in the dish and put in the microwave long enough to meet the butter – mine takes around one minute. When butter is melted, toss biscuit quarters in butter to coat.

Feta Pull Apart Bread

Sprinkle about a teaspoon of Greek seasoning over the buttered biscuits. Top with a 4 oz container of feta cheese.

Feta Pull Apart Bread

Bake at 425 degrees for about 20 minutes or until bread in center of dish is baked.

Feta Pull Apart Bread

Pull apart and enjoy! We love Feta Pull Apart Bread with just about everything, but it is especially delicious with a good soup like my Spicy Tomato Soup or Lasagna Soup.

[yumprint-recipe id=’47’]

Spicy Tomato Soup

Spicy Tomato Soup

One of the best things about cold weather is that there are so many occasions to eat soup. I love soup of almost any variety, but I’m pretty partial to a good bowl of Spicy Tomato Soup. I first tried my hand at Spicy Tomato Soup when I came across Edie’s recipe at LifeInGrace. Edie is one of those people you wish lived next door to you because you’d really like the chance to discuss with her the important things of life like homeschooling, liturgy, the perfect recipe for pizza dough, and Loretta Lynn songs. And she makes a mean pot of soup.

While Edie’s was the first spicy tomato soup recipe I made from scratch, I have honed it over the years to the degree that it has become my own. Isn’t that the hallmark of any good recipe? I make this recipe for my gang at least once a month, and I always make extra so that I can have a couple of bags in the freezer. It is delightful with a grilled cheese sandwich, a pan of Homemade Loaded Cornbread, or as pictured with my Feta Pull Apart Bread. If you aren’t as keen on spiciness as we are, feel free to adjust the level of sriracha or leave it out entirely. But since I almost always have a hankering for sriracha in all its glory, I add in a couple of extra squirts.

*Note: For this recipe, you’ll need a submersion blender. If you don’t have a submersion blender, you can blend it in a regular blender, but DO NOT fill the blender more than half full. Don’t ask. Just trust me on this.

To make a big pot of Spicy Tomato Soup, here’s what you’ll need:

3 14-0z cans of diced tomatoes
1 can chicken broth
2 tablespoons olive oil
1/2 of a medium onion, diced
A 6-oz can of tomato paste
1/2 cup buttermilk
1 teaspoon garlic powder
1 tablespoon leftover coffee
1 tablespoon dried basil
Kosher salt and freshly ground black pepper

In a large dutch oven, heat the olive oil over medium heat and saute the onion until soft.

Add the canned tomatoes, chicken broth, garlic powder, coffee, basil, salt, and pepper. Simmer for about 30 minutes.

Add in the can of tomato paste and stir until blended. Heat for about 5 minutes.

Remove from heat and stir in buttermilk.

Blend with submersion blender until smooth.

Spicy Tomato Soup can be served immediately, but it is also good after being refrigerated. It freezes beautifully.

[yumprint-recipe id=’46’]